12. ‘Paper’ Towels

So we’ve been doing cloth diapers and I made some cloth napkins a couple of months ago, which have more than served their time. Lots of messes around here. My grandma’s awesome friends who make cloth diapers en masse for charity had sent me a garbage bag full of birdseye cotton when I made C’s

Scraps of blue birdseye cotton. Hmm... the potential!
Scraps of blue birdseye cotton. Hmm… the potential!

diapers, and that was what I used for the napkins. It works really well now that it’s been washed a few times, so I figured I would use what was left to make cloth paper towels. Which, by the way, is such an awkward name… I mean, they’re not paper. The end. They’re kitchen rags that you don’t intend to use for dishes. Oh well, it’s all semantics.

I’m not really in the habit of paying money for my projects – is that bad? – but I wanted some cute cotton print (read: quilting fabric) for the reverse side of these. Luckily the fabric store had a sale, so I went that week. And it got even better, because there wasn’t much left, so they gave me the last bit for even cheaper – something about the end of bolt price. Didn’t even know they did that. Score! Making them was pretty straightforward, if a little time-consuming.

All finished, ready to get dirty.

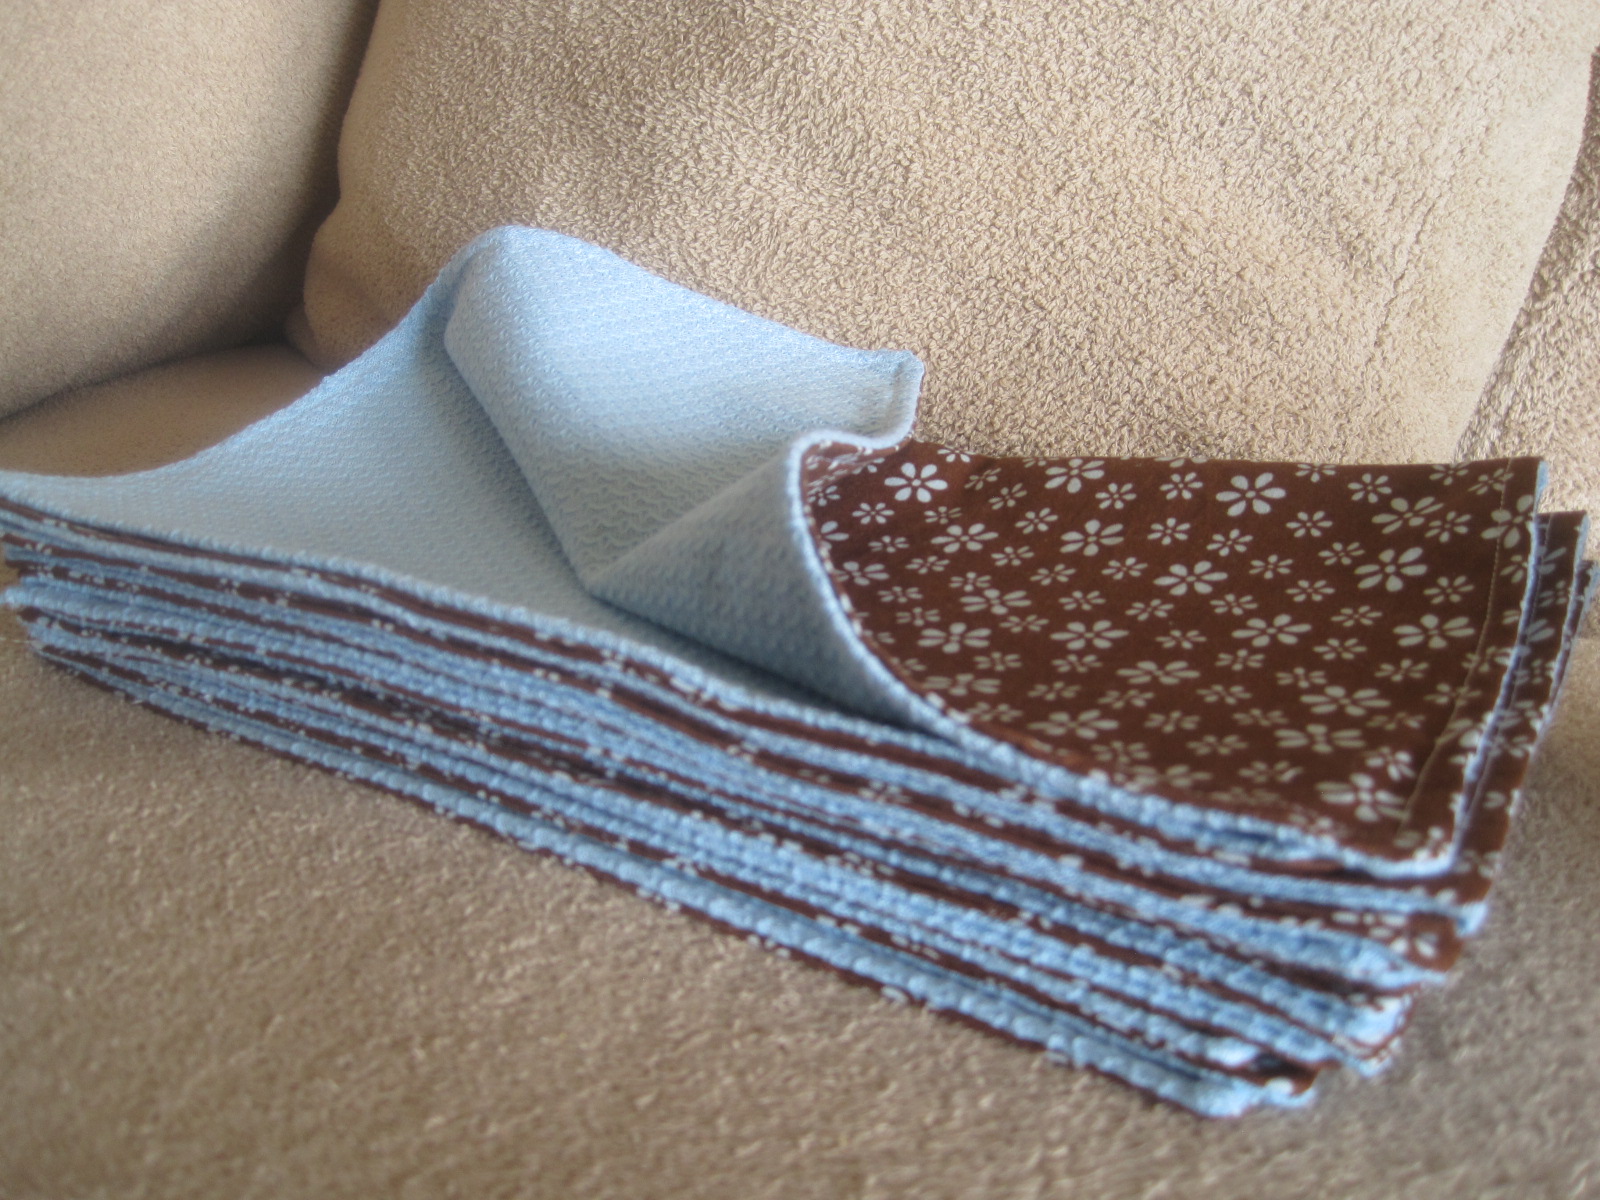
Cut squares (I think I did 12×12, or whatever I could get out of my scraps of birdseye), serge together with a hole to turn, clip corners, turn, press, topstitch. Turned out pretty dang cute if I do say so myself. I’m in love with the flowers.

If you feel that you need to this yourself, but need more specific directions, this is a good tutorial, with some good ideas in the comments. I opted out of the snaps/velcro because I’m still keeping regular paper towels in my kitchen for now (don’t feel like trying to wash bacon grease out of my cute cloth towels), so I will just put these in a napkin holder until I think of a more brilliant storage idea. If you happen to have a more brilliant idea, please feel free to share!

12. ‘Paper’ Towels

11. Baby Hats

The bad news about the new baby being a boy is that I don’t get to make cute baby girl clothes.

The good news about the new baby being a boy is that I don’t have to find money to buy baby girl clothes.

Why are boy clothes so BORING? If anyone could help me out with that, I’d be very appreciative.

Anyway, we pretty much have everything we need for the new baby because we have all of C’s clothes and gear and toys. The big difference is that C was born in January, and this baby is due at the beginning of May. So I figured I could justify making him some different hats, since he probably won’t need the super-warm knit ones I made for C, but will still need a light something. So we dug out the boxes of boy pajama fabric from my mom’s basement and found a few cute, lightweight knits.

About as cute as little boy clothes get, right? I especially like the colorful tools.

Now I probably have extra hats, but come on – it’s a baby. Since I don’t get to buy little girl dresses, and the hats are basically free, I think I deserve at least one hat in each fabric I like.

11. Baby Hats

10. Tooth Fairy Pillow

My tooth fairy pillow, as it has been since I was losing teeth.

This pillow was mine when I was a little girl. My mom cross-stitched the design and it had my name at the bottom (as you can see in the ‘before’ picture). You can’t really tell from the picture, but ever since I was a little girl (twenty years ago) this pillow has been sitting around with its last seam incomplete. It’s like the prototypical unfinished project. Well, I FINISHED IT! Wahoo!

My mom was cleaning out her house and found it. She held this out to me – “Your sister and I thought you might need this for your kids. You could just take your name off.” Well, how could I say no? Besides, I always loved the pillow. 🙂

So it sat around for a couple of weeks. Then I decided to do a BUNCH of sewing projects all at the same time before the baby comes, so I figured I had better do this too so I could put it away. I took the front and back apart (I’ll have two boys, it doesn’t make sense to have it be pink), picked out my name, and made ‘nickel’ be spelled right. That’s been bothering me for a really long time. My mom, too, it turns out – that made me laugh.

Finished! At last.
Finished! At last.
IMG_1250
And here’s the back.

Anyway, I was using some lightweight denim for my other projects and figured that would be great for the back of the pillow. So I ironed the front, measured it, cut a piece of denim to match, and serged them together. Of course, I left the hole at the top so I could stuff the pillow form in again.  Then I got the pillow form in and stitched up the hole at the top. Oh, and I was referring to this tutorial on ladder stitching – it was very good. Anyway, the pillow turned out super cute! The best part is, every time I look at it there’s this mild sense of surprise that it doesn’t have a hole at the top of it… 🙂

10. Tooth Fairy Pillow

8. Wool Dryer Balls

Suddenly I find myself doing crazy things like making dryer balls. How did I get here?

I had wool yarn that a neighbor gave to me from when she helped clean out someone’s garage – so my total cost was pretty much nothing. I did wash the yarn before I wound it, because it smelled like garage and there was some stuff stuck in it. But I figure even with the extra work to wash the yarn, they

IMG_1199
Here are the balls of yarn before they were felted. Don’t look too much different, really.

are free. Even if they turn out to not help at all I won’t be heartbroken. Took four skeins to make eight balls.

The felting was interesting, since I’ve never done it before; but luckily I wore a hole in my nylons on Sunday, so I had them to knot the balls in. It’s all working out well so far, don’t you think? Mondays are laundry day AND husband had the day off, so I did – let’s see – five loads of laundry? And the dryer balls got in on either three or four of those. Plenty to felt the yarn together. Wahoo!

8. Wool Dryer Balls

C. The Great Divorce – C.S. Lewis

Since I read Screwtape Letters not too long ago, when I was at my mom’s house and she had a copy of The Great Divorce sitting on her kitchen counter, I borrowed it. I really enjoyed it. It’s a more regular, narrative structure (since Screwtape Letters is all letters) and that makes it a little easier to stay focused. It’s also more descriptive and appealing to the imagination.

For me personally, the “people-watching” feeling of it was especially great. I have a hard time understanding people, but I find it interesting to sit back and watch them and try to figure out what they’re thinking later. Most of the book felt like this – here’s a conversation or an individual or a situation, here’s what happens, why? What happened in their life that prompted them to act this way? What things about their experiences or personality prompted them to make those choices?

One thing I really admire about Lewis’ writing style is how efficient he is. There are such big ideas and so many thoughts packed into so few (about 150) pages. I feel like I can read his books over and over because even though it’s not a huge investment of time, the ideas are complex enough that I learn something new each time.

C. The Great Divorce – C.S. Lewis

5. Boot Cuffs

Been a while since I posted anything, since I was making lots of secret projects for Christmas… 🙂

I’ve been meaning to do this for a couple of months now – got a used sweater and cut the sleeves off to make boot cuffs. I tried using my sewing machine to zig-zag stitch the tops and then stitch the edges down, but it turned out way too bulky. So then I just rolled the raw edge down and whip stitched it with a needle and thread. I like the way that turned out much better.

Boot Cuffs

5. Boot Cuffs

3. Loop Baby Toy (and 1.1, Puzzle Ball Revisited)

More projects!

Predictably, I found the link to this awesome pattern for a Loop Baby Toy on Pinterest. So cute! I thought it would be age-appropriate and super cute to make a matching loop toy and puzzle ball. Both good grasping toys for a younger baby. Of course you can’t see in the picture that the loop toy has jingle bells stuffed into it so that it rattles – and the puzzle ball comes apart into three rings. I think they’re cute together. Would make a great set for a gift, since I only spent two (very uncommitted) days on each. Maybe eight hours of hard work altogether.

3. Loop Baby Toy (and 1.1, Puzzle Ball Revisited)